Saturday, April 27, 2013

Jamie Mueller our 1st Mirror Ball Dot Enthusiast


Jamie Mueller, from St. Louis, Missouri, is our first Enthusiast to post a project for the Mirror Ball Blog Hop. Hint: I know she has several projects to post ;)

To be fair to Jamie, she's not just an enthusiast - she is a dotty fanatic of Mirror Ball Dot. She has a great history with the fabric and a very personal attachment to it. 

For many people like me, designing fabric is a business. And being in business one needs to be sensitive to certain things (to name a few): trends in color, size and motifs, timing of a release of a fabric, inventory, when something has run its course and needs to be discontinued.

Discontinue Mirror Ball Dot? Well... Jamie wouldn't have it. 

So she rallied other lovers of the design and started a petition... and an exact quote from the ring leader....

"Okay ya'll,
I spoke with the President of Michael Miller Fabrics and BEGGED him to reprint the Mirror Ball Dots because they are AMAZING! I asked if a petition would help and he said yes! So please if you have photos of this fabric upload it and SIGN the petition! I started this POST (discussion). Just leave a comment saying you will sign and I will create a list and email him!! We can do it, he seemed VERY willing to reprint if I got a lot of people involved! :) Thank you so much!! We can do it!!" 

October 2010

And perhaps I should just leave it at: And the rest is history...

Check out what Jamie has done for the Mirror Ball Blog Hop by visiting her blog at:

  Jamie Mueller / Sunflower Quilts - www.jamiemueller.blogspot.com

And don't forget to leave a comment to enter to win one fat quarter of Mirror Ball Dot in your choice of 5 colors and a Mirror Ball Dot color card. There are 6 more chances to win!

The winner of the prize from last week's comments on my blog is:

Linda!
April 21, 2013 at 11:54 AM

Congratulations!

Please send me your mailing address and the 5 colors of MBD that you would like to receive to: markhordyszynski@mac.com 

You can find them by visiting the Michael Miller Fabrics website direct link here:

Now, let's hop along to Jamie's blog and see what she's going to reveal on Sunday.

Wednesday, April 24, 2013

Mid-week Musings

The response to the Mirror Ball Blog Hop has been stupendous, and it's only 3 days into my post. On the first day you MBD Wanna-bes (LOL!) showed support with 189 hits and 11 comments on the first day alone.

This Saturday I shall introduce our first MBD Enthusiast, Jamie Mueller, who will post her creations for us. Yes, plural - creations! But in the meantime, some things that have taken place in the interim.

For a few weeks now I have been throwing out peeks at what I was doing for my pieces for the Art of Trash Maui - Trashion Show. The event was this past Friday evening, to kick off the opening of the Art of Trash Maui exhibit. I'll post more links to the Facebook page and the YouTube video when they are finished. In the meantime....

Also check out the Facebook page! It has a photo gallery of more of my pictures.


This is Tina. 

She's one of the coordinators of the event. Her outfit was made of (what I believe to be...) a Teflon ironing board cover and chain mail made from soda can tabs. This was wonderful as it was slinky, shiny and her skirt made whispery-tinkly sounds as she walked.

Students from one of the local middle schools wearing their trash creations

A couple of group shots before the event commenced


UPCYCLED IN WONDERLAND
                                                                                                                       

Paula my model.
Her dress skirt is made from a Styrofoam packing sheet. The waist is Styrofoam packing sheet and plastic packaging cut into strips and knit.
Her hat is layered plastic mesh onion bags and her flower a spray paint can and detergent top. Her glove is Styrofoam mesh that protects fruit.


             Ira is wearing board shorts made from reusable shopping bags, a cap of stripped and knit plastic bulk packaging and a soda can tab chain and computer circuitry necklace.


Wigs from pool noodles and a dress made from cat food bags and mattress covering


And now... I am sure many have been privy to this but as one who grew up in the suburbs and then lived a 15 year stint in NYC, I hadn't been exposed to this.

Free range chickens run the property where I live, on a daily basis. They make noises - crowing, cooing, clucking - sounds which I have become accustomed to and have become part of my psyche. I am in tune with the volume, proximity and regularity of it all.

And the irregularity. As in a hen and her chicks. They are like a traveling circus coming to town - melodically hearolding  their approach, when they are roaming out and about...

So, one day as I was going about my business I heard the hen and her chicks' approach. Nothing seemed amiss until I realized all was quiet. I could tell, by the direction of their last sounds, what window to peer out to see the group. What follows is what I witnessed upon discovering the silence, and then waiting patiently with my eye to the view finder of my camera...


It was like watching a pinata bursting open and the contents spilling out.

And just a bit of food...
(Clockwise from top) 
A salad of seeded and peeled local cucumbers, Kalamata olives, sweet Maui onions, Kula tomatoes, feta and a splash of balsamic vinegar and virgin olive oil; grilled kebobs of chicken, red and green peppers, yellow crook-neck squash and sweet Maui onion; Spinach pie; cucumber-yogurt sauce.

Marinade for kebobs

I am sure this would work well with beef and lamb, and a fleshy, firm white fish as it did with the chicken.

1/2 cup olive oil
1/4 cup freshly squeezed lemon juice
2 cloves garlic, minced
2 tablespoons Dijon mustard
2 tablespoons dried oregano
1 tablespoon chopped fresh thyme leave or 1 teaspoon dried thyme
2 tablespoons chopped fresh parsley
1 teaspoon freshly ground black pepper
1 tablespoon chopped fresh rosemary or 1 teaspoon dried rosemary
Mix all marinade ingredients and pour Into a zip lock bag over the meat and vegetables. Zip the bag closed and shake to coat the contents well. Marinate for 4 - 24 hours,  then broil or grill to desired doneness. The marinade is a bit thick and very flavorful.


Saturday, April 20, 2013

So... Let the Hop Begin!


This is an exciting moment. A few months of coordinating, telephone calls, emails, mailing packages and great conversations have lead to this... the Mirror Ball Blog Hop.

I can guarantee that this will be informative, inspiring and creatively stimulating. We're also going to become well acquainted before we're through. I hope it's going to be like a great book or a movie series - for when it comes time to end we're sad because we spent so much time together and it's time to say, "Aloha."

With this first post the Blog Hop is officially launched. The concept was to get six designer/artists/bloggers - all Mirror Ball Dot enthusiasts - to work with the new color palette that was released last year. I limited the participants to four fat quarters of Mirror Ball Dot and one-quarter yard of 3 colors of Michael Miller Fabric's Cotton Couture. They were sent 1 yard of each color of Cotton Couture and were allowed to use their discretion in using it but just the same, I tried to limit what they were allowed to work with. The backing, batting, binding or other incidental materials were left to their choosing.

Over the next 8 weeks we're going to share ideas, thoughts and tips on working with the shimmery, glimmery, pearlized, iridescent geometric fabric call Mirror Ball Dot.


Each MBD Enthusiast will post on their respective blogs, so you're going to have to "hop" around, and at each stop you'll have an opportunity to win a Mirror Ball Dot color card and one Fat Quarter of 5 colors of your choosing of Mirror Ball Dot fabric. This week for my post it's real easy to win! Simply leave a comment and a winner will be chosen at random. Winner to be announced in next Sunday's blog post.


April 21:  Mark Hordyszynski - Launch of the MBD Blog Hop and his project
April 28:  Jamie Mueller / Sunflower Quilts - www.jamiemueller.blogspot.com
May 05:   Linda Solovic - http://lindasolovic.blogspot.com
May 12:   Karen Neary - http://sewkaren-lycreated.blogspot.com
May 19:   Elisa Albury - http://stitchoutsidetheditch.com
May 26:   Dory Smith Graham - http://worthygoodstextile.wordpress.com
June 02:  Nanette Zeller - www.NanetteSewZ.com
June 09:  Mark Hordyszynski - Close of the MBD Blog Hop / More MBD Inspiration / Judging for Blog Hop Winner              

So, without further ado, here is...
Pieced Tapa                          

Tapa in Hawaiian is a paperlike cloth. The designs are typically geometric: squares, triangles, diagonal and criss crossing lines, curves forming pointed ovals and 4-leaf clover shapes.

I chose: 4 FQs of Mirror Ball Dot in Onyx, 2 x 1/4 yards of Cotton Couture in Soft White and 1/4 yard in Lava. In addition (with the exception of the Lava C.C.) I was going to alter both fabrics before using them in my piece.

There are two basic methods for altering fabrics: Discharge - the removal of color from a fabric - and Dyeing/Painting - the addition of color to a fabric. Both are explained below.

Pieced Tapa (20" x 30")

Mirror Ball Dot: Onyx

Cotton Couture:
Soft White (tie dyed); Lava

Siren Song: Sunset


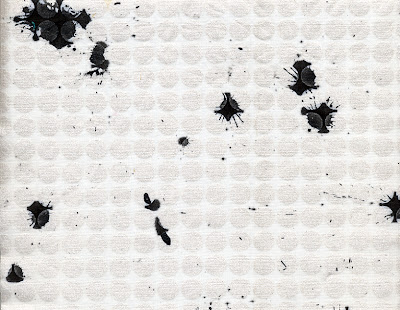
Here are two examples of using Mirror Ball Dot with discharge and dyeing (or in this case spattered dye could be called painting).

Snow MBD overdye-spattered with black India ink using an eye dropper - a perfect compliment to the metallic-pearl dot.

Choose a paint or dye that is suitable for the fabric you have selected, and follow the manufacturer's directions for use.

Always test a sample piece of fabric before engaging in the bulk of your project. This helps determine whether your materials are compatible and allows you to get a feel for working with your
technique.
                                                                                                                
Onyx MBD discharged using bleach (or a specially formulated product) to remove color from a fabric. This technique, even more than dyeing, is unstructured and tends to be unpredictable but very fun and  gratifying. 

Different fabrics discharge differently, and many factors determine the outcome, all of which come to play in the end product. Here, bleach is applied to the cotton fabric, and the fabric is placed in the sun. The bleach saturated areas will fade and discharge the color. Things to consider: Are you using 100% bleach, 50% bleach / 50% water, or some other combination of bleach and water? Is it a bright, sunny day or slightly to mostly overcast? Dark colors show better contrast than light colors do. Be assured that whatever circumstances prevail, your results will be unique for that piece of fabric.

Please note: Do avoid using chlorine bleach on any synthetic fiber; the damage is irreversible.

The discharged Mirror Ball Dot shown was done many years ago, was part of my stash, and I was looking for an excuse to finally use it. Ergo, I'd use it in this project!


So that was decided. The Cotton Couture I planned on tie-dyeing for a look and colors that were a modern interpretation of actual tapa cloth. I needed it to be done fast and efficiently with guaranteed professional results - and that is why I turned to my good friend Meriah of Meriah's Maui Dyes - my go-to gal for all things dyed. Of specific note to all you dyers out there: She said of tie-dyeing the Cotton Couture: It dyed better and nicer, with high saturation of dye and color, than some PFD cottons available in the market!

Meriah did a wonderful job and I couldn't wait to get it home to see it next to the MBD discharge.

I barely got through the front door and the two fabrics were out on my work table lying next to one another and... (Home Alone face) - CLASH! The discharge process turned the black background of the Mirror Ball Dot fabric a dark, deep, rich brown-black and there wasn't enough contrast between it and the tie dye - luckily I still had the yard of Onyx so that got thrown into the arena instead.

It wasn't until I was piecing the top together that I decided to throw in a curve ball - something I like to do - adding a sense of the unexpected - so I worked in one of my favorite colors and shades of orange - that fiercely intense warning orange (or as Pantone would have it - Tangerine Tango) to throw the top off kilter slightly, and the quilting came to me in my unrestful sleep that same evening. 


The binding - Siren Song in Sunset - was chosen because again, it's that great shade of orange striped with purples, and I had a piece that was just large enough to cut binding strips from.


Painting and Dyeing:

Supplies:
100% cotton fabric         Fabric paint or dye of your choice          Eyedropper for spatter
Bristle or foam brush for painting             Protective Gloves          Covered work space

Spatter:
1. Fill an eyedropper with paint or dye. Slowly and carefully squeeze a single drop from the eyedropper onto the fabric. (The further away from the fabric the bigger the "splat".) First work in a circular motion across the fabric, and then in a grid pattern, manipulating the drops to cover the surface of the fabric to your liking.

2. Allow the dye to set or the paint to dry according to the manufacturer's directions. Heat set as needed by ironing on the wrong side of the fabric.

Paint:
1. Paint the color onto the right side of the fabric with a bristle or sponge brush. Dilute paint and dye to produce a softer watercolor look with feathered edges. Undiluted dye or paint will produce solid color with very little bleeding.

2. Allow the dye to set or the paint to dry according to the manufacturer's directions. Heat set as needed by ironing on the wrong side of the fabric.


Discharging: 
The conditions described are an ideal scenario. Adapt as needed to your particular situation.

Supplies:
100% cotton fabric for discharging          Squeeze bottle with a very narrow tip
Bleach          Hydrogen peroxide          Bucket of warm, soapy water     Protective gloves

1. Gather all supplies in a centralized place, in a bright, sunny spot.

2. Place the fabric right side up in the sun. If you are concerned about damaging your work area, protect it with plastic.

3. In a bucket, mix 1 cup of hydrogen peroxide to 1 gallon of warm, soapy water.

4. Put on gloves and fill the squeeze bottle half-full with bleach or a diluted solution of bleach and water to your preference. Then drip, squirt, squeeze or dribble the bleach (or mixture) onto the fabric. When it has been covered sufficiently, stop. The sun and bleach will react immediately and lighten the color of the fabric.

5. After the desired discharged effect or lightness has been achieved (after no more than 5 minutes), put on gloves, and plunge the fabric into the peroxide bath to neutralize the bleaching reaction. Soak for 20 minutes.

6. Rinse the fabric thoroughly in clean water. Machine wash the discharged piece of fabric with soap and liquid fabric softener on a gentle cycle. Dry on lowest temperature.


Wednesday, April 17, 2013

Preview: Art of Trash Maui - Trashion Show Outfits

Womenswear:

Plastic mesh bulk onion bags
Assorted color and size plastic bottle caps
Plastic packaging
Styrofoam sheet packing material

Plied plastic mesh onion bags wide brim hat

Flowers for hat made of plastic bottle caps and plastic lime juice container

Waistband made of knitted strips of Styrofoam packing sheet and plastic packaging, top and skirt of Styrofoam packing sheet 

Menswear:

Up-cycled reusable shopping bags
Aluminum soda can tabs
Plastic bulk packaging (Bounty paper towels)
Computer hard drive circuitry

Shorts of reusable shopping bags, knit skull cap of stripped bulk plastic packaging, chain of soda can tabs and computer circuitry

Tuesday, April 16, 2013

Don't You Just Hate It When...

...things don't work out like you had planned?

Well, at least I am prepared with a back-up plan or two although some contingencies cannot be overcome.

It's Saturday afternoon and just under a week until I launch the Blog Hop. I am the first to post my project using Mirror Ball Dot and Cotton Couture and I have not even begun my piece. Oh, it's all mapped out in my brain, and sketched out on paper. After weeks of preparation, the fabrics are finally finished and I am set to go but now... NOW! what I had designed isn't gelling.... meaning the fabrics don't coordinate as I had envisioned. Okay, no worries. Don't panic. I am fortunate enough to have enough fabric to open a small, local quilt shop.

Thusly, move on to Plan B. I can be very happy with this option. Prepped yet again and ready to go... Mother Nature decides to stick it to me. 25-30 mph winds start blowing. Can't keep anything that isn't tied down on the lanai from taking flight and rearranging itself to another location. Fabric included. Maybe the writing on the wall says, "Call it a day. Take a chill. Go inside and blog."

Thanks, I think I'll do just that... but... hmmm...I wonder if I can get the charcoal grill started as planned... =\

Next day Sunday. Day 2: Quilt top done. Happyish with it. More than that really. I am always too hard on myself. There are things I would change, pieced work the seam riper is just longing to tear out but I shall leave it. The design is one I hope to make several times and each time I know I'll get better and better...

But until I get to unveil the completed realization of my endeavors in Sunday's post, here's some food for thought... literally!

The packaging of the ferns, no less intriguing than its contents, and the ferns themselves awaiting picking over and washing.

Grilled Maui Cattle Company New York Strip Steak, Wild Porcini Mushroom Sea Salt and Butcher Grind Black Pepper, Grilled Maui Onions

Grilled Fillet of Atlantic Salmon, Sweet Chili-Red Pepper and Honey Glaze

Sauteed Pohole Ferns, Meyer Lemon Brown Butter, Macadamia Nuts

Grilled thick cut Sour Dough Garlic Bread, Grilled NY Strip Steak, Caramelized Maui Onions, Wisconsin Blue Cheese

Sunday, April 7, 2013

Easter Sunday Munch and Tropical Fruitcake Poke

I hope everyone had a great fun doing whatever it was to enjoy your Easter Sunday. Mine was low key.

The highlight of my day was chatting with Mom and Dad, and my sister via Skype. I previewed what I had been working on earlier in the day, which were my garments and accessories for the Art of Trash Maui's Trashion Show. I'll be posting more about the event as we near the show opening which is the evening of April 19th.

I also decided to make fun little dishes as opposed to a traditional holiday meal. I went for color mostly, yet everything had a sweet and savory play of flavors.

Seafood Salad of calamari mussels, shrimp and scallops marinated in olive oil, calamansi (a small, tart citrus the size and shape of kumquats), celery, fennel and fresh thyme over baby arugula. Crostini of goat cheese, candies mango, macadamia nuts and kalamata olives.

Clockwise: Sweet beets with horseradish and sour cream; New ginger and Hawaiian honey glazed tri-colored Kula carrots; Curried broccoli salad with raisins and cranberries.

Natural dye eggs: Beet juice for deep red and Turmeric for yellow on free range brown eggs

Flash forward a week. It's now Saturday morning, April 6th. I'm prepping to submit my entry for the Maui Ag Fest's cooking contest sponsored by the Maui Food Technology Center. My creation is Tropical Fruitcake Poke (poh-kee). Poke is traditionally understood to be, in Hawaii, cubed fish tossed with sea salt, sesame oil, chopped onions, soy and kukui nuts. The definition of poke in Hawaiian is to cut into cubes or slices.

Now, as I was going to present fruitcake for the event, I wasn't going to just slap a loaf of cake on a plate. Presentation or sight, the first sense perhaps after smell when it comes to food is just as essential if not more important than taste, since seeing the food set in front of you precedes eating. Cut into batons or pieces roughly finger sized, I decided the description poke would suit my needs and throw the understanding of what I was serving into question...

Tropical Fruitcake Poke drizzled with Waialua Estate dark chocolate from the Big Island

I haven't heard from the competition sponsors so I am guessing I didn't place this year and that's okay. It might have been nice to win 2 years in a row but that also might have been piggish. What matters is that I was completely satisfied with the cake, its presentation and I made quite a few contacts at the Ag Fest. I also bought some yummy things to play (cook) with... such as pickled strawberries and pickled pineapple from Maui Preserved, fresh Pahoa ferns, and right off the tree loquats. I'll be blogging about my use of these wonderful ingredients as I use or prepare them.

Friday, April 5, 2013

Rotary Cutter + Bounty Paper Towel Packaging + Knitting Needles =

Plastic strips tied together into a ball of yarn...


...and using a knit and purl stitch and a few nights later...


A rib-knit cap as part of my men's outfit for the Art of Trash Maui - Trashion Show. Surprisingly it's quite comfortable and lightweight! Whodda thunk it?

Wednesday, April 3, 2013

Fairfield World Poly-fil Giveaway

Aloha!

Fairfield World is giving away a bag of their Poly-fil! Just go to their Facebook page and share your ideas on how to use my Seed Bead Starfish... a winner will be picked at random on Friday and announced on Monday.

Happy creating!


Monday, April 1, 2013

Seed Bead Starfish

I'm the Featured Designer for Fairfield Processing this month!

You won't find these beauties at the beach, but luckily you can make them for yourself in a rainbow of colors.


Seed Bead Starfish are easy to make using scraps of fabric. Mix and match fabrics for the tops and bottoms to create your own individual color and pattern combinations. My favorite fabrics are some with surface interest, such as Michael Miller's Fairy Frost designed by yours truly! :) Or make them very modern and use Mirror Ball Dot!!

These brightly colored starfish seem to be jumping for joy and can be used to adorn a wide variety of projects. On pillows they add a cluster of sparkle here and there. Add a clasp and use to keep your scarf closed, or pinback as jewelry for a lapel or hat brim. Fill a glass bowl with starfish to use as a centerpiece or add a braided loop to decorate packages or as ornaments. Glue a magnet on the back and use it to post notes on the refrigerator or a suction cup for a window display. The possibilities are endless!

These are addictive to make and when it comes time to glue on the beads, the process reminds me of decorating cookies with colorful sugar crystals.

Click here to download the free pdf for the project.