This is an exciting moment. A few months of coordinating, telephone calls, emails, mailing packages and great conversations have lead to this... the
Mirror Ball Blog Hop.
I can guarantee that this will be informative, inspiring and creatively stimulating. We're also going to become well acquainted before we're through. I hope it's going to be like a great book or a movie series - for when it comes time to end we're sad because we spent so much time together and it's time to say, "Aloha."
With this first post the Blog Hop is officially launched. The concept was to get six designer/artists/bloggers - all Mirror Ball Dot enthusiasts - to work with the new color palette that was released last year. I limited the participants to four fat quarters of
Mirror Ball Dot and one-quarter yard of 3 colors of Michael Miller Fabric's
Cotton Couture. They were sent 1 yard of each color of Cotton Couture and were allowed to use their discretion in using it but just the same, I tried to limit what they were allowed to work with. The backing, batting, binding or other incidental materials were left to their choosing.
Over the next 8 weeks we're going to share ideas, thoughts and tips on working with the shimmery, glimmery, pearlized, iridescent geometric fabric call Mirror Ball Dot.
Each MBD Enthusiast will post on their respective blogs, so you're going to have to "hop" around, and at each stop you'll have an opportunity to win a Mirror Ball Dot color card and one Fat Quarter of 5 colors of your choosing of Mirror Ball Dot fabric. This week for my post it's real easy to win! Simply leave a comment and a winner will be chosen at random. Winner to be announced in next Sunday's blog post.
April 21: Mark Hordyszynski - Launch of the MBD Blog Hop and his project
June 09: Mark Hordyszynski - Close of the MBD Blog Hop / More MBD Inspiration / Judging for Blog Hop Winner
So, without further ado, here is...
Pieced Tapa

Tapa in Hawaiian is a paperlike cloth. The designs are typically geometric: squares, triangles, diagonal and criss crossing lines, curves forming pointed ovals and 4-leaf clover shapes.
I chose: 4 FQs of Mirror Ball Dot in Onyx, 2 x 1/4 yards of Cotton Couture in Soft White and 1/4 yard in Lava. In addition (with the exception of the Lava C.C.) I was going to alter both fabrics before using them in my piece.
There are two basic methods for altering fabrics: Discharge - the removal of color from a fabric - and Dyeing/Painting - the addition of color to a fabric. Both are explained below.
Pieced Tapa (20" x 30")
Mirror Ball Dot: Onyx
Cotton Couture:
Soft White (tie dyed); Lava
Siren Song: Sunset
Here are two examples of using Mirror Ball Dot with discharge and dyeing (or in this case spattered dye could be called painting).
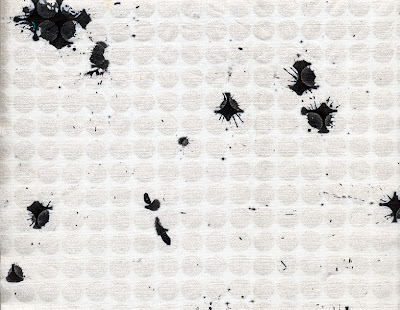
Snow MBD overdye-spattered with black India ink using an eye dropper - a perfect compliment to the metallic-pearl dot.
Choose a paint or dye that is suitable for the fabric you have selected, and follow the manufacturer's directions for use.
Always test a sample piece of fabric before engaging in the bulk of your project. This helps determine whether your materials are compatible and allows you to get a feel for working with your
technique.
Onyx MBD discharged using bleach (or a specially formulated product) to remove color from a fabric. This technique, even more than dyeing, is unstructured and tends to be unpredictable but very fun and gratifying.
Different fabrics discharge differently, and many factors determine the outcome, all of which come to play in the end product. Here, bleach is applied to the cotton fabric, and the fabric is placed in the sun. The bleach saturated areas will fade and discharge the color. Things to consider: Are you using 100% bleach, 50% bleach / 50% water, or some other combination of bleach and water? Is it a bright, sunny day or slightly to mostly overcast? Dark colors show better contrast than light colors do. Be assured that whatever circumstances prevail, your results will be unique for that piece of fabric.
Please note: Do avoid using chlorine bleach on any synthetic fiber; the damage is irreversible.
The discharged Mirror Ball Dot shown was done many years ago, was part of my stash, and I was looking for an excuse to finally use it. Ergo, I'd use it in this project!
So that was decided. The Cotton Couture I planned on tie-dyeing for a look and colors that were a modern interpretation of actual tapa cloth. I needed it to be done fast and efficiently with guaranteed professional results - and that is why I turned to my good friend Meriah of
Meriah's Maui Dyes - my go-to gal for all things dyed. Of specific note to all you dyers out there: She said of tie-dyeing the Cotton Couture: It dyed better and nicer, with high saturation of dye and color, than some PFD cottons available in the market!
Meriah did a wonderful job and I couldn't wait to get it home to see it next to the MBD discharge.
I barely got through the front door and the two fabrics were out on my work table lying next to one another and... (Home Alone face) - CLASH! The discharge process turned the black background of the Mirror Ball Dot fabric a dark, deep, rich brown-black and there wasn't enough contrast between it and the tie dye - luckily I still had the yard of Onyx so that got thrown into the arena instead.

It wasn't until I was piecing the top together that I decided to throw in a curve ball - something I like to do - adding a sense of the unexpected - so I worked in one of my favorite colors and shades of orange - that fiercely intense warning orange (or as Pantone would have it - Tangerine Tango) to throw the top off kilter slightly, and the quilting came to me in my unrestful sleep that same evening.
The binding -
Siren Song in Sunset - was chosen because again, it's that great shade of orange striped with purples, and I had a piece that was just large enough to cut binding strips from.
Painting and Dyeing:
Supplies:
100% cotton fabric Fabric paint or dye of your choice Eyedropper for spatter
Bristle or foam brush for painting Protective Gloves Covered work space
Spatter:
1. Fill an eyedropper with paint or dye. Slowly and carefully squeeze a single drop from the eyedropper onto the fabric. (The further away from the fabric the bigger the "splat".) First work in a circular motion across the fabric, and then in a grid pattern, manipulating the drops to cover the surface of the fabric to your liking.
2. Allow the dye to set or the paint to dry according to the manufacturer's directions. Heat set as needed by ironing on the wrong side of the fabric.
Paint:
1. Paint the color onto the right side of the fabric with a bristle or sponge brush. Dilute paint and dye to produce a softer watercolor look with feathered edges. Undiluted dye or paint will produce solid color with very little bleeding.
2. Allow the dye to set or the paint to dry according to the manufacturer's directions. Heat set as needed by ironing on the wrong side of the fabric.
Discharging:
The conditions described are an ideal scenario. Adapt as needed to your particular situation.
Supplies:
100% cotton fabric for discharging Squeeze bottle with a very narrow tip
Bleach Hydrogen peroxide Bucket of warm, soapy water Protective gloves
1. Gather all supplies in a centralized place, in a bright, sunny spot.
2. Place the fabric right side up in the sun. If you are concerned about damaging your work area, protect it with plastic.
3. In a bucket, mix 1 cup of hydrogen peroxide to 1 gallon of warm, soapy water.
4. Put on gloves and fill the squeeze bottle half-full with bleach or a diluted solution of bleach and water to your preference. Then drip, squirt, squeeze or dribble the bleach (or mixture) onto the fabric. When it has been covered sufficiently, stop. The sun and bleach will react immediately and lighten the color of the fabric.
5. After the desired discharged effect or lightness has been achieved (after no more than 5 minutes), put on gloves, and plunge the fabric into the peroxide bath to neutralize the bleaching reaction. Soak for 20 minutes.
6. Rinse the fabric thoroughly in clean water. Machine wash the discharged piece of fabric with soap and liquid fabric softener on a gentle cycle. Dry on lowest temperature.